This has been on my to-do list for a long time. I have seen this multiple times on pinterest, with slightly different ideas for how to make them. Mine may not be the most durable, but I decided to just buy some sticker paper to use in making these.
Materials: sticker paper, pop-sickle sticks
Assembly: I simply printed out a photo on the sticker paper, stuck it to the pop-sickle sticks, and used an Exacto knife to carefully cut the sticks apart. That's it! No mess involved.
Activity: Kids can put together the sticks to form a favorite photo.
Showing posts with label busy bag. Show all posts
Wednesday, March 5, 2014
Friday, February 28, 2014
Busy Bag: Pegboard Letters
This bag is really built around a great "toy" that I suggest buying. I picked these up at a teacher store years ago, and they have provided hours of building entertainment for Theodore and now Eli. Ours are similar to these Stacking Pegs, and could be used to work on colors, patterns, or just developing fine motor skills and hand-eye coordination.
Because of his interest in letters this last year, we decided to make this into an alphabet activity to extend the use of this toy for Theo. I used illuminations dynamic paper, and created a dot template that we printed out. Then we drew most of the letters (not all worked with straight lines) on the templates. Theo watched me draw and "okayed" all the templates and agreed on the letters they represented. We'll see how Theo likes this new task.
| Connecting Pegs at 20 months |
| Building a Tower at 24 months |
Because of his interest in letters this last year, we decided to make this into an alphabet activity to extend the use of this toy for Theo. I used illuminations dynamic paper, and created a dot template that we printed out. Then we drew most of the letters (not all worked with straight lines) on the templates. Theo watched me draw and "okayed" all the templates and agreed on the letters they represented. We'll see how Theo likes this new task.
| Letter activity at 4 years old. |
Thursday, February 27, 2014
Busy Bags: Pre-School Math (Bear Patterns, Butterfly Symmetry, Numbers in the Sand)
For the past couple years, we have been getting very restless come February. That gets me in the mood to put together some "busy bag" activities for Theodore to keep him from going too crazy with cabin fever. So, I'm going to be putting up a handful of our favorite activities and busy bags.
In addition to some activities that focus on shape and number identification, I wanted to put together some more math inspired ones for my just turned four-year-old.
I bought these counting bears on sale at a teacher store years ago, and they have had quite the life getting carried all around in dump trunks, shot down the bobsled ramp, working on one-to-one correspondence, and used as cargo on the railroad. They were a big part of color sorting with Theo was younger, and now I wanted him to be able to explore patterns with them.
Materials: counting bears, pattern cards (I can email you a set if you ask), construction paper (optional) and laminator (optional)
Assembly: I found an image for each color bear, and then started making the typical ABAB, AABB, ABCABC patterns in Microsoft Word. On some I left space for the pattern to be continued while on others I inserted blank boxes in between bears to be filled in. After this I cut mine out, backed with construction paper, and laminated them for long life.
Activity: Have your child pick which cards he would like to complete, and they can continue patterns or fill in the empty boxes. Be sure to check for accuracy.
I fell in love with this one the first time I saw it, as I'm a huge lover of all types of symmetry, plus, butterflies are such a popular subject for children's literature and science activities.
Materials: butterfly pieces printed on cardstock from here, felt, laminator (optional)
Assembly: Cut out the felt pieces as directed. Laminate butterfly cards if desired. *If you choose to make blanks, you will need to cut out extra pieces of the wings as there are only one of each color.*
Activity: Model how to set up the butterfly and create a mirror image with the felt pieces, and then let your child go. With my child, he first wanted to use the cards more as puzzles, finding the circles and wedges that fit on each wing. As a young four-year-old, this has been a challenging activity for him so far but he keeps chugging away at it.
This one is not so much a bag, but is a great activity I saw that I wanted to share.
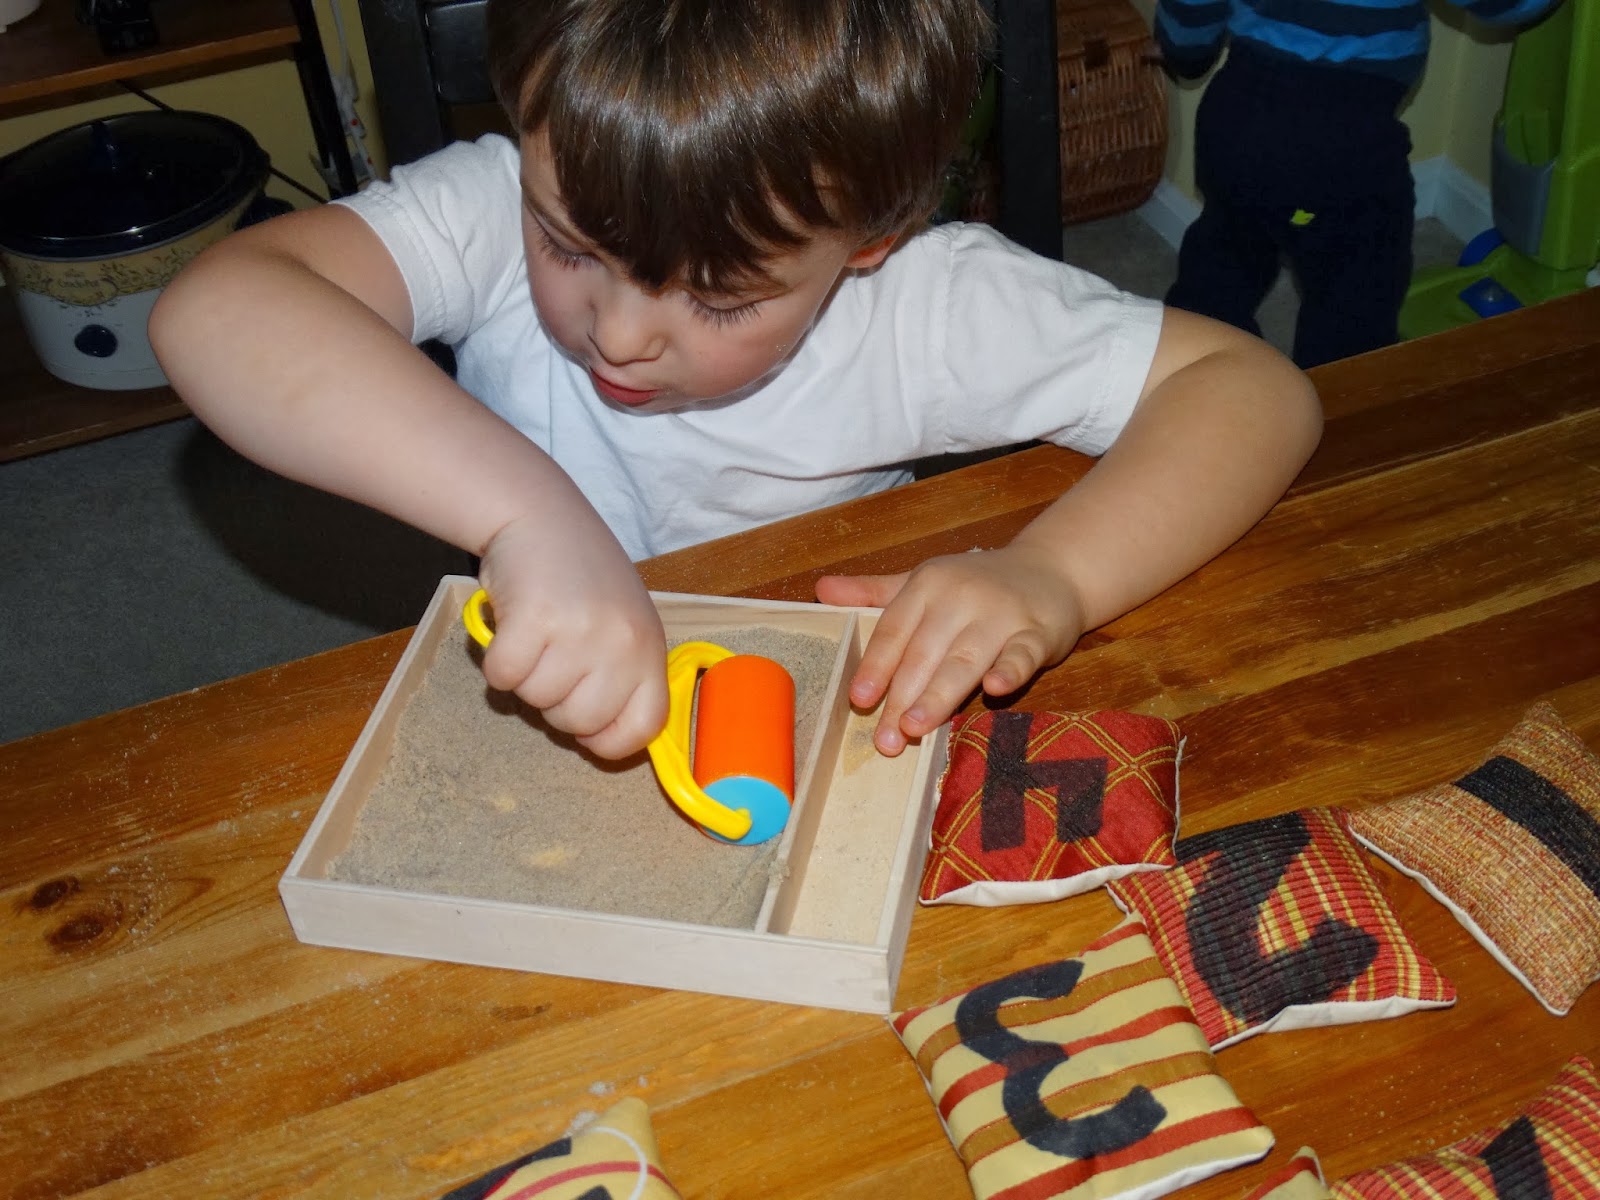
Materials: container (the wooden card holders from Melissa and Doug work great), sand, numeral cards, roller (optional)
Assembly: Pour clean sand into container.
Activity: I used some number bean bags for this, and simply had Theodore pick a bean bag, and then try to trace that number in the sand. He decided he would like a "roller" from his play-do set to help him smooth the sand out after each number and I thought that was a great idea. He went through and did all the numbers, some with more success than others.
In addition to some activities that focus on shape and number identification, I wanted to put together some more math inspired ones for my just turned four-year-old.
I bought these counting bears on sale at a teacher store years ago, and they have had quite the life getting carried all around in dump trunks, shot down the bobsled ramp, working on one-to-one correspondence, and used as cargo on the railroad. They were a big part of color sorting with Theo was younger, and now I wanted him to be able to explore patterns with them.
Materials: counting bears, pattern cards (I can email you a set if you ask), construction paper (optional) and laminator (optional)
Assembly: I found an image for each color bear, and then started making the typical ABAB, AABB, ABCABC patterns in Microsoft Word. On some I left space for the pattern to be continued while on others I inserted blank boxes in between bears to be filled in. After this I cut mine out, backed with construction paper, and laminated them for long life.
Activity: Have your child pick which cards he would like to complete, and they can continue patterns or fill in the empty boxes. Be sure to check for accuracy.
I fell in love with this one the first time I saw it, as I'm a huge lover of all types of symmetry, plus, butterflies are such a popular subject for children's literature and science activities.
Materials: butterfly pieces printed on cardstock from here, felt, laminator (optional)
Assembly: Cut out the felt pieces as directed. Laminate butterfly cards if desired. *If you choose to make blanks, you will need to cut out extra pieces of the wings as there are only one of each color.*
Activity: Model how to set up the butterfly and create a mirror image with the felt pieces, and then let your child go. With my child, he first wanted to use the cards more as puzzles, finding the circles and wedges that fit on each wing. As a young four-year-old, this has been a challenging activity for him so far but he keeps chugging away at it.
This one is not so much a bag, but is a great activity I saw that I wanted to share.
Materials: container (the wooden card holders from Melissa and Doug work great), sand, numeral cards, roller (optional)
Assembly: Pour clean sand into container.
Activity: I used some number bean bags for this, and simply had Theodore pick a bean bag, and then try to trace that number in the sand. He decided he would like a "roller" from his play-do set to help him smooth the sand out after each number and I thought that was a great idea. He went through and did all the numbers, some with more success than others.
Thursday, November 7, 2013
Thanksgiving Button-Turkey (Busy Bag)
I saw some of these button turkeys recently, and realized I had to make one for Thanksgiving. Theodore is really at the age now where he is understanding seasons and holidays, and gets very excited by the changes in decor he sees with these, so I knew he'd love having his own little turkey. And, he needs desperately to get better at all aspects of dressing himself, so practicing buttons in a fun way sounded perfect.
I couldn't really find any patterns or tutorials for this that were quite my style, so I went ahead and just free-handed the whole project, making my own changes as I went. And I decided I would try and write up some directions for others to use.
Felt: 4 or more colors for feathers, plus two browns for turkey body, red for the wattle, yellow for the beak
Buttons: 4 or more colors to match feathers
embroidery thread and needle, thread
sewing machine, button hole foot
seam ripper, scissors, glue
eyes
stuffing
seam ripper, scissors, glue
eyes
stuffing
1. Cut out feathers, turkey body, turkey head, beak, and wattle. Here's a screen shot of my template, but feel free to contact me for the PDF file.
2. Next I went ahead and put the button holes in all the feathers. I haven't done a button hole in probably over ten years, so it took me some time re-learning how to do this on my machine (even had to break out the manual). Once I figured it out, it became very easy to repeat. You can search for how to sew a button hole, but basically you set your dial to 0.5, and then use the 1, 2/4, 3, 2/4 stitches on your second dial. The machine does all the work. I learned to make sure to keep the needle up whenever I turned the dial to the next stitch. I then opened them up using a seam ripper.
| I did not even remember what this foot was for. |
3. Next, I hand sewed on all the buttons using embroidery thread. I'd love to learn how to do this on the machine sometime.
4. Finally, I stitched on the turkey head, beak, and wattle. I glued the eyes on. I then hand stitched the turkey body closed, stuffing it before the last few stitches.
As soon as I stuffed it, Theo became excited for his "turkey pillow" that Elmo and Elizabeth now get to sleep with. He is getting really good at buttoning all the feathers on.
I thought it turned out pretty well. But apparently, I should have added wings. Because Theodore has been brought practically to tears by the idea that a turkey is a bird. He is convinced they don't have wings.... and don't get him started on penguins. He thinks they are fish...
Monday, October 28, 2013
Recycled/Reused Toys for a One Year Old
I really don't know why we buy toys for our boys at all. Our kids would be fine with sticks, cardboard boxes, blankets, silverware, measuring cups and all of our recyclables. They are both explorers, and seem to have long attention spans with each toy they explore. But we do buy them. And I LOVE toys, especially those for very young children.
Lately, Eli has been having too much fun getting into the two cabinets that are not locked in the kitchen, and pulling books off the bookshelves in the living room. So, I finally put together some more busy bag type activities for him to keep him out of my stuff. Almost all of these activities/toys were made from stuff already around the house.
Pipe Cleaner Poke: Simply putting some pipe cleaners into a clean Parmesan cheese container creates a fun toy. Big brother took his turn enjoying it too.
Fabric Pull: Some squares into a wipes container saved us from having to hide the real wipes container all the time.
Cupcake Sorter. I've been keeping the cardboard tubes from toilet paper and paper towel for weeks now, but don't really have anything to do with them. This was my first use. This one and the last idea came from here.

Lid Drops: A while back I went ahead and put a hole in a milk jug so he could use it to drop lids into. Recently I made this one from a cocoa container. This quick and easy one was a quick favorite with him. While designed as another place to deposit lids and caps, he quickly decided it was better as a bowl when he put his spoon inside to stir. Additionally, he has fun taking the lid on and off, as well as shaking it too. Another great idea from here.
Puff Push: I had done this back in the day for Theo, and Eli has taken to it. He's really good with it.
Shaker Bottles: I've also found a lot of these ideas on pintrest. Just filling a bottle with something interesting to see/hear has provided Eli with a lot of entertainment. This is one I now throw in the car for carseat entertainment. The one filled with beads (left overs from an algebra film canister activity ages ago) was originally his favorite, but after a while he has really started liking watching the glitter swirl inside the second one.

Can you tell he's enjoying them?
Lately, Eli has been having too much fun getting into the two cabinets that are not locked in the kitchen, and pulling books off the bookshelves in the living room. So, I finally put together some more busy bag type activities for him to keep him out of my stuff. Almost all of these activities/toys were made from stuff already around the house.
Pipe Cleaner Poke: Simply putting some pipe cleaners into a clean Parmesan cheese container creates a fun toy. Big brother took his turn enjoying it too.
Fabric Pull: Some squares into a wipes container saved us from having to hide the real wipes container all the time.
Cupcake Sorter. I've been keeping the cardboard tubes from toilet paper and paper towel for weeks now, but don't really have anything to do with them. This was my first use. This one and the last idea came from here.
Lid Drops: A while back I went ahead and put a hole in a milk jug so he could use it to drop lids into. Recently I made this one from a cocoa container. This quick and easy one was a quick favorite with him. While designed as another place to deposit lids and caps, he quickly decided it was better as a bowl when he put his spoon inside to stir. Additionally, he has fun taking the lid on and off, as well as shaking it too. Another great idea from here.
Puff Push: I had done this back in the day for Theo, and Eli has taken to it. He's really good with it.
Shaker Bottles: I've also found a lot of these ideas on pintrest. Just filling a bottle with something interesting to see/hear has provided Eli with a lot of entertainment. This is one I now throw in the car for carseat entertainment. The one filled with beads (left overs from an algebra film canister activity ages ago) was originally his favorite, but after a while he has really started liking watching the glitter swirl inside the second one.
Can you tell he's enjoying them?
Tuesday, October 8, 2013
Busy Bag: Do-a-Dot
I finally went through and tried to organize and unpack our office. I was looking for felt for a new project, and ended up getting motivated enough to finish the whole room. Doing so, I found several of the busy bags I didn't finish in February when we originally packed up our old place. Hopefully I will get some of those done in the next few weeks.
One of our favorite activities lately has been using the do-a-dot markers. Apparently, these are a great material that are fairly clean but still allow kids to be artistic. We purchased them months ago, and have used them in free art and also in working on letter formation. The wonderful link below includes files with all of the letters. I printed out all the ones in Theo's name and he worked on "dotting" them all. He and Maci also used them to make birthday art for Eli. They turned out so cute. (We also ran into these at Meet-the-Teacher day at preschool, as well as the National Children's Museum. They seem to be super popular right now.)
Materials: Do-A-Dot markers found here, and the letter templates are great and can be found here.
Assembly: Put the markers and templates in a bag.
Activity: Have them use the markers to fill in templates, working on dexterity, hand-eye coordination, fine motor skills and recognition of numbers or letters. These can also be used for a variety of art projects.
One of our favorite activities lately has been using the do-a-dot markers. Apparently, these are a great material that are fairly clean but still allow kids to be artistic. We purchased them months ago, and have used them in free art and also in working on letter formation. The wonderful link below includes files with all of the letters. I printed out all the ones in Theo's name and he worked on "dotting" them all. He and Maci also used them to make birthday art for Eli. They turned out so cute. (We also ran into these at Meet-the-Teacher day at preschool, as well as the National Children's Museum. They seem to be super popular right now.)
Materials: Do-A-Dot markers found here, and the letter templates are great and can be found here.
Assembly: Put the markers and templates in a bag.
Activity: Have them use the markers to fill in templates, working on dexterity, hand-eye coordination, fine motor skills and recognition of numbers or letters. These can also be used for a variety of art projects.
Monday, July 29, 2013
Eli's First Busy Bag: Open and Close
This is such a simple bag that I have saw several places online, but one
of the easiest bags ever. All I did for this one was gather a few lidded containers from around the house.
Materials: contact case, pill sorters, jewelry boxes
Assembly: none required
Activity: At ten months, it is mostly a "close" bag; Eli will work to close all the compartments after I open them for him. My 2.5 year old niece was entertained by it for quite a while, using her tiny fingers to do both the opening and the closing.
Materials: contact case, pill sorters, jewelry boxes
Assembly: none required
Activity: At ten months, it is mostly a "close" bag; Eli will work to close all the compartments after I open them for him. My 2.5 year old niece was entertained by it for quite a while, using her tiny fingers to do both the opening and the closing.
Tuesday, February 19, 2013
Busy Bags for a Two Year Old (Maci), including Pin It Up
Our niece Maci just turned two, so I decided to make her a collection of busy bags using some of the materials I have from making others for Theo. Most of these aren't really suitable for kids at younger ages since they are still putting so many items into their mouths. Since she is way past that stage, these activities are good for her age (or in the near future). I also had to pick small ones that would fit in an envelope to mail easily, so her package included the following:
Build-a-Rainbow, a great color and size discrimination activity from this awesome site.
Link it Up! (just plastic, colored links)
Heads and Tails which is an easy one where kiddos match the heads to the tails for animals from the famous Eric Carle book Brown Bear, Brown Bear. Found here.
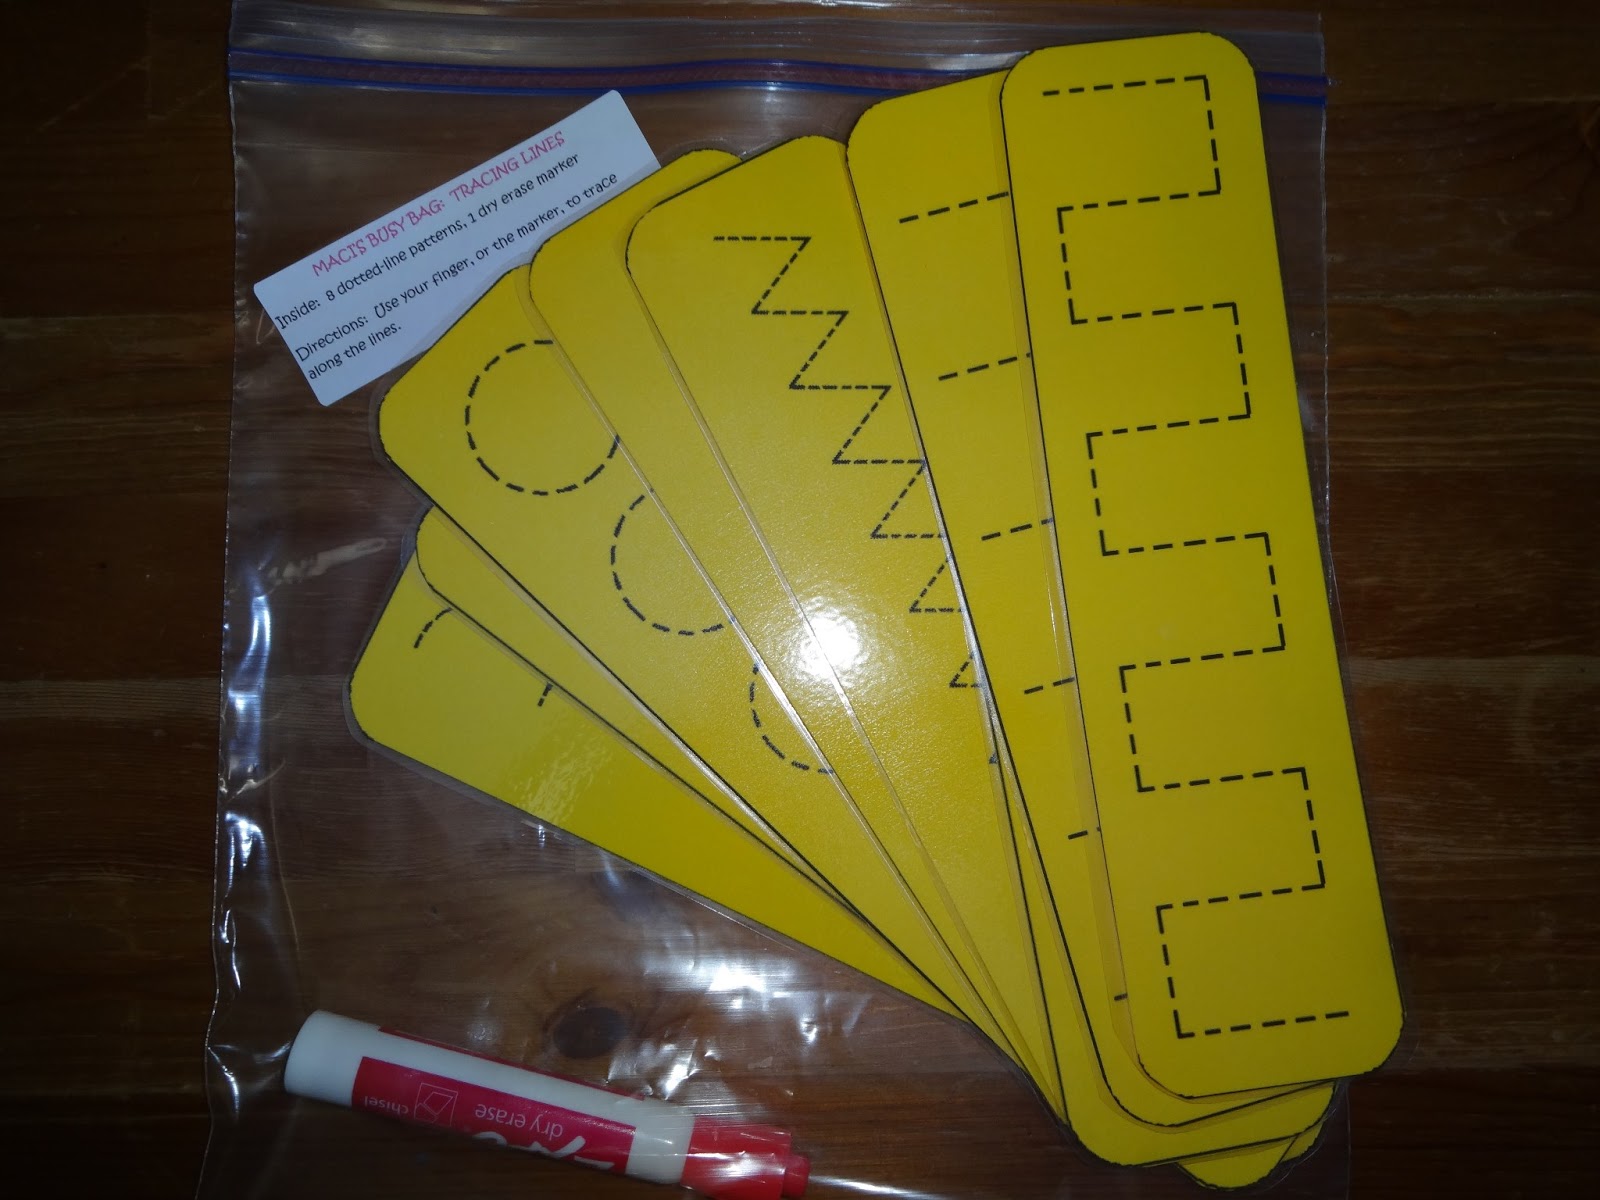
Tracing Lines, a great pre-writing activity found here.
Picture Puzzle
Pin it Up, a fun felt activity where kiddos can use clothespins to clip clothes to a clothesline.
Materials: felt, string/twine for the clothesline, mini-clothespins
Assembly: Simply cut the felt into as many pieces of clothes as you desire. My husband actually free-hand cut these for me. I thought it turned out pretty cute, especially the pink tutu!
Activity: Tie the twine to two chairs to form a clothesline. Pin the clothes to the line.
Build-a-Rainbow, a great color and size discrimination activity from this awesome site.
| Turns out great if you use their template. |
Heads and Tails which is an easy one where kiddos match the heads to the tails for animals from the famous Eric Carle book Brown Bear, Brown Bear. Found here.
Tracing Lines, a great pre-writing activity found here.
Picture Puzzle
Pin it Up, a fun felt activity where kiddos can use clothespins to clip clothes to a clothesline.
Materials: felt, string/twine for the clothesline, mini-clothespins
Assembly: Simply cut the felt into as many pieces of clothes as you desire. My husband actually free-hand cut these for me. I thought it turned out pretty cute, especially the pink tutu!
Activity: Tie the twine to two chairs to form a clothesline. Pin the clothes to the line.
I also added labels with directions, since I know my sister won't see this :)
Tuesday, February 12, 2013
Busy Bag: Egg Match-up
Materials: Felt and plastic eggs in identical colors, cardboard
Assembly: Cut the felt into half ovals that match the colors of the eggs.
Activity: Kiddos can snap together an egg, and then lay its match out in felt. The cardboard serves as a mat to organize their work.
I gave this one to Theo about 6 months ago right after Easter, and he did a pretty good job with it.
When I gave this to him today to snap a picture, he said "No, this is a car," and started stuffing the felt pieces inside and zooming the egg around the table...sigh. Being a mother of boys, everything seems to be on wheels. This one may just go straight on to Eli in a year or two.
Subscribe to:
Posts (Atom)